
Welcome back to 12 weeks of Simple Writing Lessons for Primary Grades! If you are new to This Reading Mama, please visit the introductory post. Last week, The Measured Mom showed how you can help your child make an expert list. Today, I’d like to talk about using a graphic organizer as a pre-writing strategy. Graphic organizers are great for any kind of writing, but our focus will be on story writing.
We start reading and telling stories to our children from an early age. And from an early age, our kids like to tell and “read” their own stories. But when it’s time to start writing stories, many kids aren’t quite sure what to include. Some writers do not know where to begin and some may be able to fill up page after page after page of writing. But for both kinds of writers, they need to understand what’s important for a story? What will keep the reader engaged?
“What should I put in my story?”
This is where the use of a simple graphic organizer steps in.
Simple Writing Lesson #2: Use a graphic Organizer (a pre-writing strategy)
(Note: I used this lesson with my seven-year-old son when he was in the 1st grade. This same lesson can easily be adapted for students in any grade, they are developmentally ready for it.)
When to use it:
When you want to help your student include the important parts of a story.
How to teach it:
1) Prepare your materials.
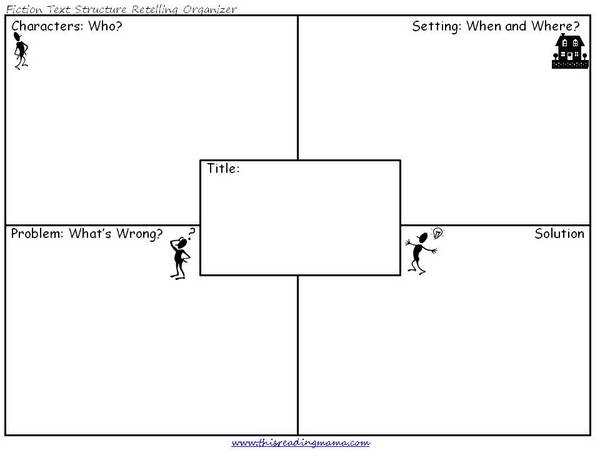
Your child should have a pencil and this printable. Click on the picture or download: Fiction Story Map Download
2) Talk about the how authors organize their stories to make you want to keep reading.
“Do you remember this Retelling Chart we’ve been using for retelling fiction stories? Well today, we’re going to use it in a different way. Instead of writing down the information from a story we’ve read, we’re going to use it to write our own fiction story!”
(Please note: This is IMPORTANT background knowledge to implement this simple lesson. If your child is not familiar with the important parts of a fiction story, stop now and spend a few days doing this together. You can read my post on The Homeschool Classroom, giving you a step-by-step approach to this. If your child struggles with retelling, this is a sign that he or he is not ready to try this simple lesson. You can read more about how to teach a struggling reader to retell in my Fiction Text Structure Series.)
3) Model your thought process as you use the graphic organizer.
Here’s what it sounded like as I modeled:
I went through this part rather quickly, as he is very familiar with this organizer already and I didn’t want to take up too much time.
“As I look at my organizer, I see that my story needs characters. So I need to decide on my characters.” I picked him and his brother as the characters. “You guys like to go to MJ’s (a bouncy house near us), so this will be where the story happens.”
“Oh, I like it there. Can we go this afternoon?”
“Probably not today. Let’s see. Now I need a problem for my story. Oh, it would be terrible if we lost your brother at MJ’s!”
“Yeah, I’d be sad.”
“We need a happy ending for our story, so I’m going to say that after looking all around, we found him in the bathroom!”
4) Guide your student as he begins to brainstorm on his graphic organizer*.
Here’s what it sounded like at our house:
“Now it’s your turn to try it out.”
“I can’t do it by myself.”
“Well, let’s try it together your first time. As you do this more and more, you’ll feel more and more comfortable doing it…”
“Oh, I know! Can I finish the story of duck?”
“Duck?” (I’m playing dumb.)
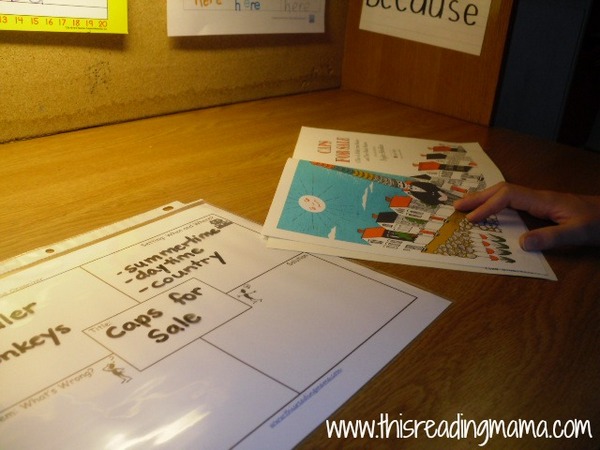
“Yeah, duck on a bike. You know, he’s looking at that tractor at the end and we always say that the author should write a story about duck on a tractor. Can I write that one?” (We had just read Duck on a Bike by David Shannon as a read-aloud that morning. This is a whole other simple lesson by itself, but young writers can “stand on the shoulders” of other authors and use their work as a pattern for their own.)
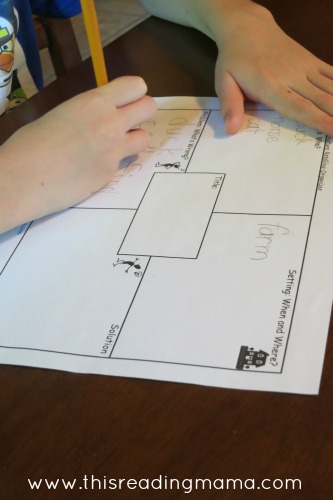
“Absolutely!” (Pointing to the organizer) “So, you already know one character-duck! Write that down here where it says characters.” (He decides to include a few characters from the book, but not all because he says, “it would be too much work.”) Okay, do you want your story to happen on the farm like it does in the original book?”
“Yes.” (writes down FARM)
“Since you’re the author, you get to decide how you want your story to go. We’re at the box that says, “Problem”. What is the problem going to be?”
“Hmmm… I don’t know.”
“Well, let’s take some time to brainstorm a few things that could happen…” (We bounce ideas off each other. The tractor could break down, the tractor is lost and duck has to find it, duck crashes the tractor, etc.) “This is your story, so you get to decide which problem will happen.”
“I want the tractor to get lost and duck has to look for it.”
“Sounds good to me.” (He writes down the problem.) “Authors know that the problems need to be solved by the end of the story. How will duck solve his problem?”
We continue until his graphic organizer is filled out.
5) Wrap up the lesson.
I could have asked him to start writing his story today, but that would be another simple lesson. We saved the actual writing for another day.
“You did a great job filling out your organizer. I’m so excited to learn more about your story as you write it! Tomorrow, we’ll start that process.”
______________________________________________________________________________________
*Side note about graphic organizers: If using a graphic organizer does not work for your child, please don’t force it. This is just one of many strategies for the writing “tool kit”. If your child would rather just write a list of ideas or verbally brainstorm his thoughts without writing them, so be it. Be sure to encourage him along the way to include the important part of a story as he does. Using a graphic organizer like this is just one way to help kids see the important parts that need to be included in their stories (not the only way).
______________________________________________________________________________________
This is the second of a 12-part series for Primary Grades. Click HERE or the image below to view more simple writing lessons.
~Becky
Comments
Trackbacks
-
[…] 14 Pre-Writing Strategy: Use a Graphic Organizer (This Reading […]
this is very helpful! I will have to read your whole series.
Thank you. That our prayer. That we can use something we feel very comfortable teaching and help other mamas, too. 🙂
Great ideas. A very similar organizer was introduced to my daughter in the first grade for retelling the story. She now likes to make stories with Story Cubes, so perhaps this could be a good “crutch” for her to get more organized with her thoughts.
Yes, I originally designed this as a retelling chart, but it works just as well for a story writing organizer! Love those story cubes!
Love this. The concept of “standing on the shoulders” of other kidlit authors and using their books as a template or prompt to write your own story is something I do a lot with my daughter and with my students.
This is a great platform for building young writer. And so helpful for teacher to explore for enhancing the students reading and writing skills.