
If you’ve landed here because you purchased my ebook, Printable Spelling Activities and Games, THANK YOU! Listed below are the spelling supplies and materials I mention throughout the book with easy links for you to find them or read more about them.
Spelling Supplies for the Teacher
These spelling supplies are ones that you, the teacher, may need to prep the activities beforehand.

1. CARDSTOCK – While optional in some instances, cardstock is thicker and works well when printing front and back (like the sight word cards in Part 1 or phonics cards in Part 4). I also prefer cardstock when the kids need to paint on it (like the Mystery Find and Spell activity from Part 4. Cardstock also makes things more durable if there are several students who will use it. 110 lb. weight is the is the one we use the most.

2. LAMINATOR – The Scotch Thermal Laminator rocks. Seriously. {Side note: I’ve had mine for 6 years and have dropped it from the top of a bookshelf…twice. And it still works like a champ.} It’s perfect for small jobs, 8.5 x 11 and smaller and makes things durable.

3. LAMINATING POUCHES – The pouches we use the most are the 8.9 x 11.4 pouches because I can put an 8.5 x 11 paper in it or smaller pieces; but there are smaller pouches, too.

4. PLASTIC SLEEVE PROTECTORS – There are times when instead of laminating, plastic sleeve protectors can be used. I use plastic sleeve protectors often, so I stick with the 100 pack. They also come in a 50 pack.

5. POCKET CHARTS – I have two pocket charts that we use almost on a daily basis: the standard pocket chart and the tabletop pocket chart. If you have room for the standard pocket chart, I love all space it affords for sorting and other activities {and it can be easily stored when not in use}. If you’d like something smaller, we also enjoy our tabletop pocket chart. Its strips are a lot smaller than the standard pocket chart, but it’s great because you can transport it easily anywhere you’d like!

6. FILE FOLDERS– File folders can be used for so many things! File folder games, portable sight word walls (see Part 1), a portable “bullentin board” for spelling charts (see Part 1) and even as a way to hide a game board, like in Sight Word Guess Who? and Spelling Battleship (Part 2). I personally like the colored folders, but the manila ones are cheaper.

7. DRY ERASE BOARD – The magnetic dry erase boards are a great way to get hands-on with spelling. Use magnetic letters, spelling tiles from All About Spelling, or take a break from pencil and paper and spell on the boards. We have both the student size board and a larger board that hangs in our schoolroom.

8. CLIPBOARDS – Make spelling activities and games portable with a simple clipboard! I much prefer the low profile clipboards. We have several that we use regularly. We have one clipboard like this one and it’s a big hit when I let the kids use it.

9. ROLLING CUBES – Rolling cubes are a staple in our home. While we use the Photo Stacking Blocks, I’ve heard from many readers that Carson Dellosa’s Differentiated Instruction Cubes work just as well with all the printables I’ve made. Part 1 of this book has quite a lot of letter, digraph, and blend inserts that will fit these blocks.

10. LARGE PAPER CLIPS – We use our large, colorful paper clips as DIY spinners for the games.
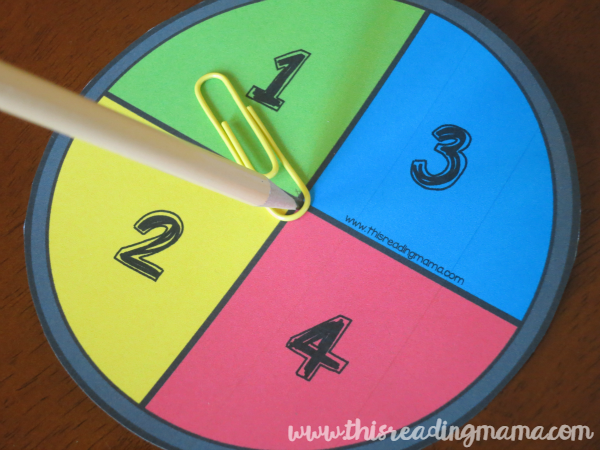
Just use a pencil to keep the paper clip in place and flick with your finger. {You can also print off the arrows from the pages or purchase durable spinners.} In Part 2, we also used our large paper clips for the fishing game.

11. TACKLE BOX – This one is totally optional, but still totally worth it, in my opinion. I bought mine in the sports/fishing section of Wal-Mart, but it’s similar to this one.

12. INK JET PRINTER – I know it’s a complete shocker, but it takes ink to print out all these spelling activities and games! I do not currently own these particular models {my printer is an ink-guzzler}, but both the HP Officejet Printer and HP Envy 7640 came highly recommended from several other homeschooling moms who create and print a lot of printables.
Looking for a comprehensive spelling curriculum?

1. WORDS THEIR WAY – Words their Way is definitely my first love when it comes to teaching spelling. I have used it in the classroom, as a reading tutor, and as a homeschooling mom. I love their developmental approach to spelling and the way that the word sorts require kids to analyze and categorize words based on their similarities.
The original book {like a textbook} has the theory behind word study as well as an AMAZING word list at the back. And their word sort supplement books make teaching the word sorts a cinch.
2. ALL ABOUT SPELLING – When teaching kids who are dyslexic or really struggling in spelling, I recommend All About Spelling because it breaks down the structure of words even further than the words sorts from Words Their Way. All About Spelling (and All About Reading) was specifically designed with dyslexic and/or struggling spellers in mind.
Spelling Supplies for the Student

1. LETTER TILES – Letter tiles are such a simple way to give kids some hands-on practice at spelling words. You can find several activities in the book that suggest letter tiles.

2. LETTER BEADS – Letter beads not only add a hands-on touch to spelling, but they are great for fine motor skills as well! If you have a child/student who struggles with using string, try letting a pipe cleaner instead!

3. LETTER STAMPS – I’ve had several different kinds of letter stamp sets over the years, but my favorite are the Melissa & Doug set. We also use several different colored stamp pads by Hampton Art.

4. MAGNETIC LETTERS – The magnetic letters we use constantly are made by Educational Insights. I prefer these because they are shaped like printed letters, but they have quite the collection of magnetic letters!

5. DRY ERASE MARKERS – We’ve used several kinds of dry erase markers over the years, but I’ve come to love the kind that has the eraser attached to the pen top like these or these. This makes it less prep time for me since the eraser is already attached! Another option is to use Vis-A-Vis markers, as they tend to erase easier in my experience.

6. ERASABLE COLORED PENCILS – You might see these erasable colored pencils featured in a few of our activities. When two students are sharing the same board, it’s nice that both players can have a different color to differentiate which student wrote which words.

7. MARKERS – Although I can’t always convince my kids to use them, I prefer the Pip-Squeaks markers {especially for younger children} over the broader/fatter markers because they encourage more conventional pencil grip.

8. DICE – SO many of the games and activities in this book have a die/dice included! Dice can make a rather boring activity, like handwriting, a little more interesting at times.

9. POWER MAGNETS OR COUNTERS – Often games will call for a counter or small manipulative. While you can use whatever you have on-hand, two of our favorite ones to use are our Power Magnets and our Transparent Counters.

10. “WORD” NOTEBOOK – A simple bound journal or spiral bound notebook makes the perfect “Word Notebook” or “Word Journal” that kids can use to jot down their spelling words or record words from these spelling activities when you don’t want to necessarily print out the recording sheets.

11. FISHING ROD – We used our fishing pole from our Melissa & Doug fish puzzle {because we already own it}, but you can also make your own simple fishing pole like you see here.

12. COOKIE SHEET/TRAY – I use our cookie trays quite often when a playing piece is included that might “jump” off the table, like a die or other small manipulative, like we did in our Spelling Hopscotch from Part 2.
THANK YOU again for purchasing!
- Subscribe by email {get really cool FREEBIES when you do!}
- Google+
~Becky